How to Build Better Custom MOC Models From Instructions
Custom MOC building is where the brick hobby gets personal. You stop following one boxed set and start designing models nobody else owns. This guide teaches you how to read moc building blocks instructions as a technique library, plan original models step by step, and build action-themed display pieces like ninja temples, mechs, and dragon scenes.
Why MOC Building Beats Following One Set
MOC stands for "My Own Creation." A boxed set ends when the last page is done. A building blocks moc project never really ends — you can rebuild, upgrade, swap colors, and merge it with other models. Collectors love MOCs too: a custom ninja fortress or a one-off dragon scene stands out on a shelf because no store sells it.
Endless Replay
Rebuild, upgrade, and customize the same model indefinitely — no "end of instructions" limit.
Unique Display
A one-off custom scene cannot be bought in any store. It shows skill and personal taste.
Skill Growth
Every MOC teaches new techniques. Good instructions accelerate that growth by example.
How to Read Building Block Instructions the Right Way
Most people treat instructions as a to-do list. Pros treat them as a technique library. Clear moc building blocks instructions show you the "why" behind each step, not just the "what."
Look for Techniques
Pause and ask why each section works. Notice how the designer reinforces a wall, hides a hinge, or builds a curved roof — then photograph it for your personal playbook.
Understand Sub-Assemblies
Big builds are made of small modules. A castle is a base, walls, towers, and a roof — built separately, then joined. Spot these modules so you can mix and match across sets.
Check Part Counts and Scale
Note the piece count and the model's scale before you start. Matching scale matters when you plan to combine multiple builds into one display.
Step-by-Step: Plan Your First Custom MOC
A short planning phase saves hours of rework. Follow these five steps in order.
Pick a Theme and a Purpose
Decide what you're building and why. Display builds prioritize detail and proportion. Play builds prioritize sturdy connections. Gift builds match the recipient's favorite theme. STEM projects add a mechanical function to teach a concept.
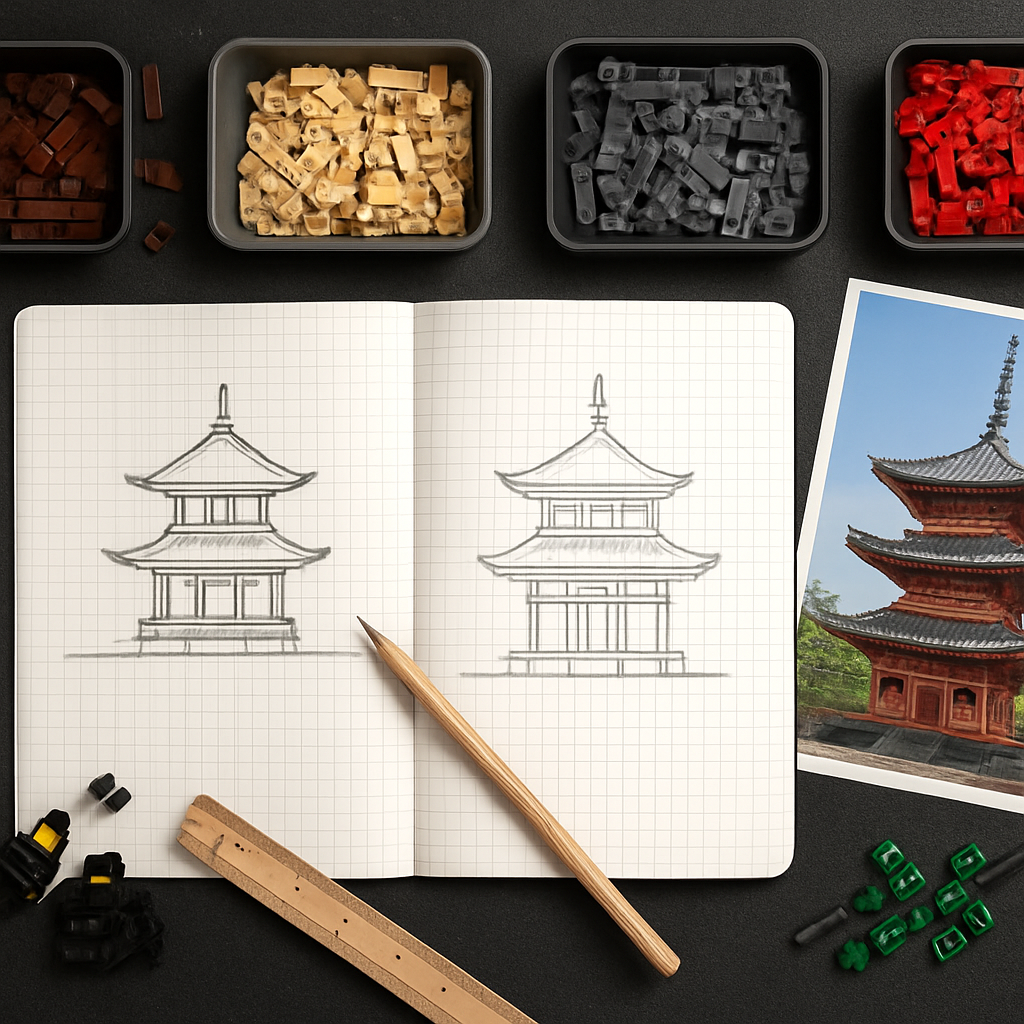
Gather Reference Images
Find three to five photos of what you want to build — a real Japanese pagoda, a movie mech, a comic-book dragon. References turn a vague idea into a clear target with defined proportions and a color palette.
Build the Core Structure First
Start with the skeleton, not the decoration. Build a solid base and the main frame before adding any detail. Lock your structure with overlapping plates and Technic beams where you need rigidity.
Add Detail in Layers
Layer on the look after the structure holds. Work in passes: rough shape first, then medium detail, then the small touches that sell the model. Roof tiles, weapon racks, lanterns, scales, armor plating.
Test, Adjust, Reinforce
Pick the model up. Does it flex? Reinforce weak corners and the center spine. For play or gift models, test that moving parts work and survive a few rounds of handling before you call the build done.
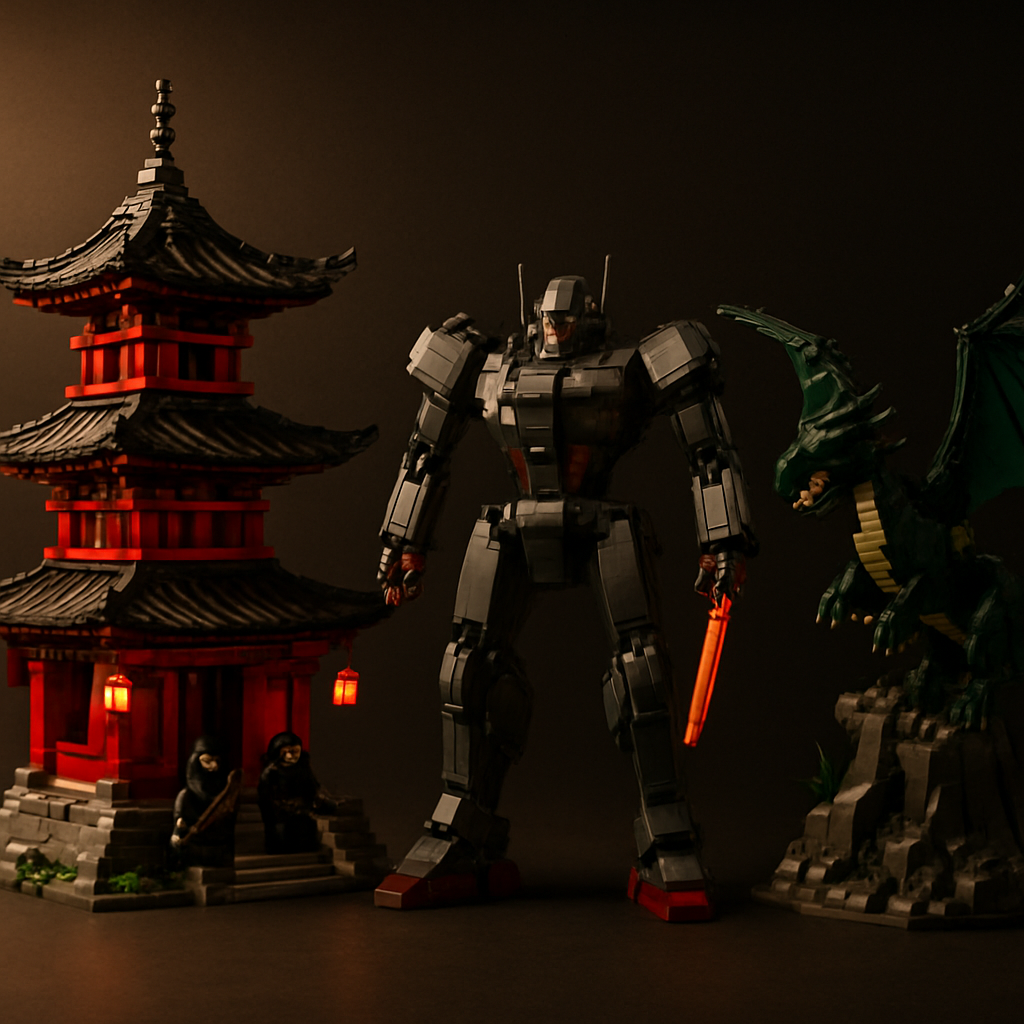
Themed Build Example: A Ninja Temple Display
One of the most popular and giftable themes in the hobby. Picture a small mountain temple — a stone base, wooden walls, a curved tiled roof, lanterns, and two ninja minifigures mid-battle on the steps.
Base
Textured rock base using mixed gray plates and slopes for uneven ground, with a flat platform on top.
Walls
Four brown and tan wall sub-assemblies with door and window gaps. Join on the platform and check square.
Roof
Slopes and inverted slopes create the pagoda curve. Build removable so you can display the interior.
Action Details
Red lanterns, a small bridge, cherry-blossom trees, weapon racks, and two posed minifigures on the steps.
Builders hunting for ninja-themed parts and figures often search for moc ninjago building blocks for sale. Themed sets give you a fast head start on minifigures, weapons, and roof pieces. Browse the Morebybourn building sets collection for compatible parts that fit standard brick systems.
Themed Build Example: A Poseable Mech
A mech build teaches joints, balance, and engineering — perfect for STEM-minded families and adult hobbyists alike.
Torso First
Build a dense, heavy torso with Technic bricks inside for strong limb attachment points. This holds the whole model together.
Engineer the Joints
Use ball joints and hinges for poseable arms and legs. Test each joint as you build — firm but movable is the target.
Balance the Build
Keep weight low and give it large, stable feet. Add weapons and armor last, then re-test balance before calling it done.
Expert Tips for Better Custom Models
Build in sub-assemblies
Make modules separately, then combine. Repairs and upgrades get far easier.
Mirror your details
Whatever you add to one side, match on the other. Symmetry reads as professional instantly.
Use tiles on top surfaces
A smooth tiled finish looks polished and lets minifigures slide without snagging.
Keep a sorted parts box
Sort by color and type so you find pieces fast when swapping mid-build.
Photograph each stage
If a technique works, you'll want to recreate it. Photos are your free personal instructions.
Save and share your build
The online MOC community is generous with feedback. Post your work and learn from other builders.
Common Mistakes to Avoid
| Mistake | Fix |
|---|---|
| Skipping the plan | Define theme, scale, and core structure before touching bricks. |
| Detailing before structure | Lock the core solid first, then add decoration. |
| Mixing scales | Pick one scale — 6-wide or 8-wide — and hold it across the whole build. |
| Weak center spine | Add a Technic beam down the middle of tall or long sections. |
| Loose, low-grade bricks | Use quality ABS parts with tight clutch power that grip after many rebuilds. |
| Ignoring the back | Display models get seen from all angles. Finish the rear as cleanly as the front. |
A Note on Quality Parts
Custom building lives or dies on brick quality. Loose bricks wobble. Mismatched colors clash. Off-spec parts won't connect to the rest of your collection. Look for high-grade ABS plastic, tight clutch power, and consistent molding. These hold their grip after many rebuilds — which matters when you're swapping parts during a custom project.
Browse themed sets and compatible bricks at Morebybourn when you need a reliable supply for your next building blocks moc project. See also the MOC Building Guide for more planning and technique articles.
Frequently Asked Questions
Do I need to design a MOC from scratch, or can I start from instructions?+
Start from instructions. Build a few sets first and study the techniques in each step. Good moc building blocks instructions teach you how designers solve real problems — reinforcing walls, hiding hinges, shaping curves. Once you have a handful of techniques, combining them into your own design feels natural.
Are third-party MOC parts compatible with mainstream brick systems?+
Yes. Quality parts are molded to the same dimensions and clutch standards as mainstream bricks, so they connect without trouble. Just check that the parts use high-grade ABS plastic for a tight, lasting grip. This matters most for moving parts like joints and hinges in mechs or poseable figures.
What is a good first themed MOC for a parent and child to build together?+
A ninja temple or a small mech is a great start. Both have strong shapes, clear color schemes, and room to add or simplify detail based on skill level. Builders looking for moc ninjago building blocks for sale can grab figures, weapons, and roof parts in one go, then customize from there.
How do I keep a tall or detailed model from collapsing?+
Three fixes solve most problems. First, build a solid core before adding any detail. Second, run a Technic beam down the center spine of tall or long sections. Third, reinforce corners with overlapping plates. Pick the finished model up and test it — if it flexes, add support before you decorate further.