How to Find, Print, and Use 3D Printable LEGO-Compatible Kits with Free STL Files
3D printing has opened a new door for brick builders. You can design, download, and print custom parts that snap right into your existing collection — no waiting for shipping, no hunting for discontinued pieces. This guide walks you through the entire process: how to source 3d printable lego compatible kits free stl files, judge their quality, pick the right material, dial in tolerances, and combine printed parts with physical sets. Whether you're a parent building with kids, a maker who loves tinkering, or an adult fan of lego alternative builds, this is your practical roadmap.
Why 3D Printed Brick-Compatible Parts Matter
Standard sets give you fixed pieces. 3D printing removes that limit. You can create custom shapes, replace lost bricks, or design parts that no manufacturer ever sold. Pair them with high-quality molded kits and you get the best of both worlds.
Replacement Parts On Demand
Missing one piece? Print it instead of buying a whole new set. Save cost and keep your build whole.
Custom Designs
Build elements no official catalog offers — unique facades, specialty connectors, one-off shapes.
Cost Savings
A single spool of filament prints hundreds of bricks at a fraction of the price of a replacement set.
Creative Freedom
Combine printed and molded parts for hybrid builds that blend precision clutch with original geometry.
Step 1: Find Reliable STL File Sources
An STL file is a 3D model your printer reads. You need files designed to fit standard brick dimensions — 8mm stud pitch, 4.8mm stud diameter. When you search for 3d printable lego compatible kits free stl files, read the description carefully. Good designers list the brick units, stud spacing, and recommended printer settings.
Thingiverse
Largest free repository. Search 'lego compatible brick' or 'studs.' Huge volume, variable quality — filter by downloads.
Printables
Hosted by Prusa. Strong community ratings help you filter quality fast. Good for print-tested designs.
MyMiniFactory
Curated models, often print-tested by the platform. Smaller catalog but higher average quality.
Cults3D
Mix of free and paid designs. Check for real-world print photos and confirmed fit comments before downloading.
How to spot quality files before downloading
- High user ratings and download counts (5,000+ is a strong signal)
- Photos of actual printed results — not just renders
- Comments confirming fit with real bricks
- Clear print settings listed: layer height, infill, supports needed
Step 2: Understand Compatibility and the Stud System
Brick compatibility comes down to one number: the stud. The standard system uses studs spaced 8mm apart, with each stud roughly 4.8mm in diameter. "Clutch power" is the grip that holds two bricks together — too loose and they fall apart, too tight and they crack.
| Measurement | Standard Value | Notes |
|---|---|---|
| Stud diameter | ~4.8 mm | Must match socket opening exactly for good clutch |
| Stud pitch (spacing) | 8 mm center-to-center | Core measurement — every compatible system uses this |
| Standard brick height | 9.6 mm | Three plates equal one brick height |
| Plate height | 3.2 mm | One-third of a brick — critical for mixed builds |
Injection-molded bricks come out of precise steel molds. Your printer extrudes plastic layer by layer, introducing small errors. Studs may print slightly oversized; holes may shrink as plastic cools. The fix is tolerance tuning — covered in Step 4.
Step 3: Choose the Right Printing Material
Material affects fit, durability, and feel. Three common filaments dominate brick printing.
PLA — Best for Beginners
Pros
Low cost, prints at low temps, minimal warping, holds detail well
Cons
Brittle under stress, softens in hot cars or direct sun
Best for: Display models and parts that won't bend often
PETG — Best All-Rounder
Pros
Durable, slightly flexible, impact resistant, heat tolerant
Cons
Can string during printing, needs retraction tuning
Best for: Parts that get handled or snapped on and off repeatedly
ABS — Best for Authenticity
Pros
Strong, matches molded brick feel, takes paint well
Cons
Warps without enclosure, releases fumes, harder to print
Best for: Advanced builders with enclosed printer and ventilation
Quick pick: Start with PLA to learn. Move to PETG for daily-use parts. Try ABS once you have an enclosure.
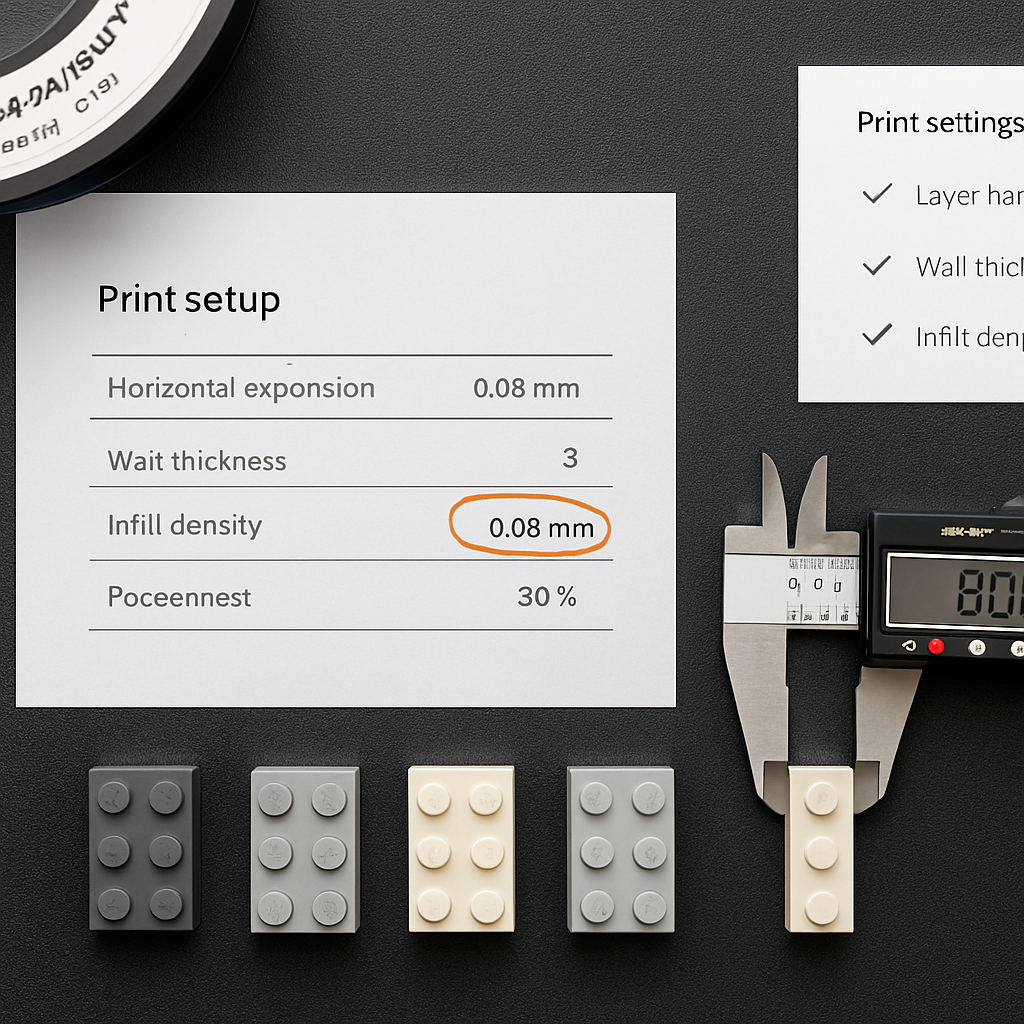
Step 4: Dial In Your Tolerances
Tolerance is the small gap allowance between parts. Your printer's nozzle adds a little extra plastic to every wall, making studs wider and sockets narrower than the file specifies. Without adjustment, parts jam or won't connect.
Print a test brick first
Never print a whole set blind. Start with a 2×2 brick. Costs minutes of filament and saves hours of wasted prints.
Test the fit
Snap it onto a real brick. Note whether it is loose, tight, or perfect. Write down your initial result.
Adjust horizontal expansion
In your slicer, set 'horizontal expansion' or 'XY compensation' to a negative value — often -0.05 mm to -0.1 mm.
Reprint and retest
Adjust in tiny increments (0.02 mm steps) and reprint until the clutch feels right. Document your working recipe.
Print at 0.12–0.16 mm layer height for crisp studs. Thicker layers blur the stud surface and weaken the grip. Slicers like Cura, PrusaSlicer, and Bambu Studio all offer the horizontal expansion setting.
Step 5: Configure Your Print Settings
| Setting | Recommended Value | Why It Matters |
|---|---|---|
| Layer height | 0.12–0.16 mm | Crisp stud surfaces and strong clutch grip |
| Infill | 20–40% | Higher for load-bearing or structural parts |
| Walls / perimeters | 3 | Adds strength and dimensional accuracy |
| Print speed | 40–50 mm/s | Slower speed improves accuracy on small features |
| Supports | Usually none for bricks | Needed only for overhangs; avoid on stud surfaces |
| Bed adhesion | Brim for small parts | Prevents corners lifting on flat bricks |
Orientation tip: Always print bricks with studs facing up. This keeps stud surfaces smooth and avoids support marks on the connection points. Supports on stud surfaces ruin the fit.
Step 6: Post-Process for a Perfect Fit
Fresh prints often need light cleanup. A few minutes of finishing makes parts feel professional. Be gentle — over-sanding loosens the grip. The goal is removing defects, not reshaping the part.
Remove Stringing
Trim loose strands with a hobby knife. Work under good light to catch thin strings that affect clutch.
Clear Stud Tops
Scrape any blobs off studs with a flat blade so they connect cleanly. Even tiny blobs cause tight connections.
Check Sockets
Run a small drill bit or pick through tight holes. Clear any elephant foot buildup around the bottom ring.
Sand Contact Points
Light sanding with 400-grit smooths rough clutch surfaces. For ABS, acetone vapor blends layer lines.
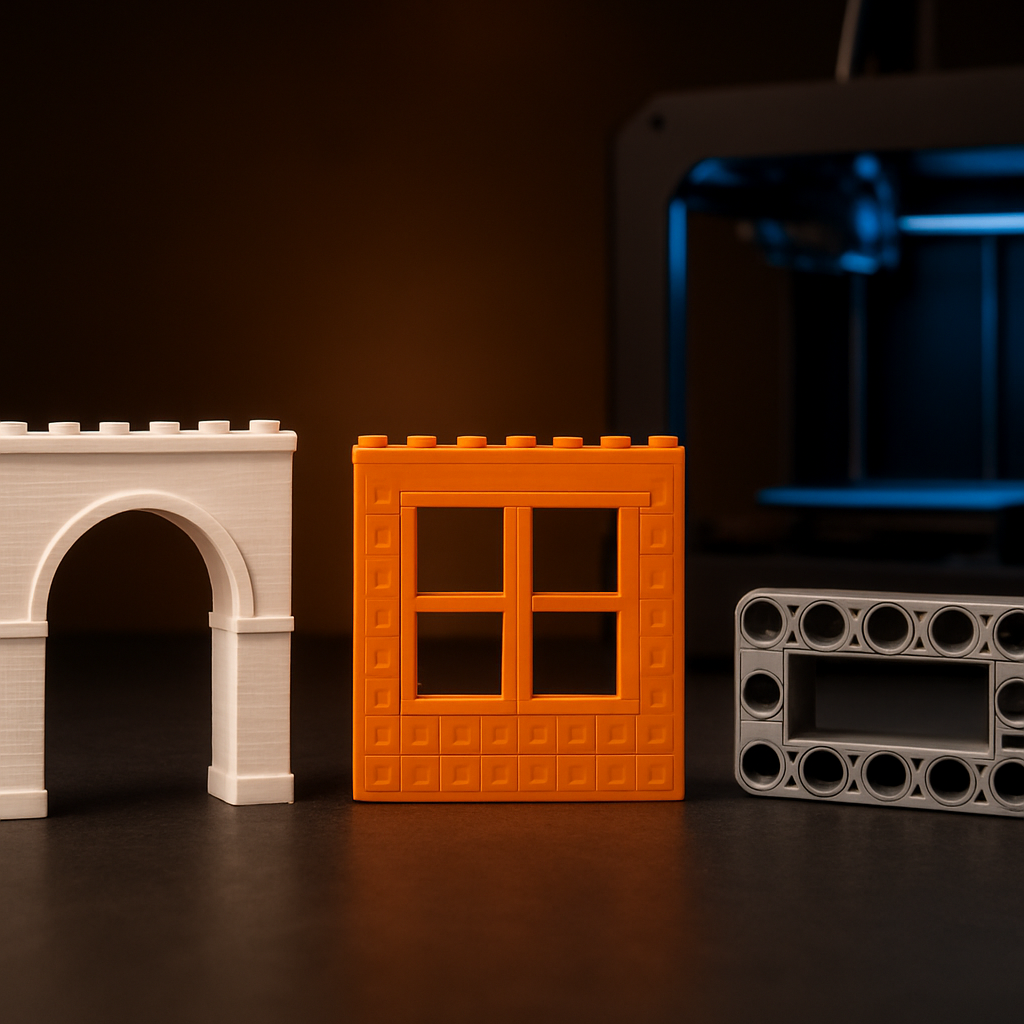
Step 7: Combine Printed Parts with Physical Kits
Printed parts shine when you mix them with molded sets. The strongest models use molded bricks for the core structure and printed parts for custom flourishes — molded parts give reliable clutch power, printed parts give creativity. For quality molded sets to pair with your prints, browse the product range at Morebybourn.
Custom Add-Ons
Print a unique facade, arch, or canopy and attach it to a molded base. The printed part adds character; the molded base provides stable clutch.
Repairs and Replacements
Lost a corner piece? Print a replacement in minutes. No waiting for shipping, no hunting discontinued stock.
Colour Variety
Print colours that aren't sold in standard sets. Unusual hues, dual-tone bricks, or metallic finishes expand your palette instantly.
Scaling Up
Use printed framing bricks to build large structures cheaply, then add detailed molded surfaces where visible quality matters most.
Step 8: Mind the Legal and Common-Sense Side
Respect Licenses
Many STL files use Creative Commons licenses. Check whether commercial use is allowed before selling printed parts.
Don't Copy Branded Molds
Printing generic bricks is fine. Cloning trademarked or patented designs to sell can cross legal lines.
Personal Use Is Broad
Printing for your own builds, repairs, and family projects sits in safe territory for most jurisdictions.
Credit Designers
When you share a remix, credit the original creator. It keeps the free-file community healthy and sustainable.
Step 9: Troubleshoot Common Problems
| Problem | Likely Cause | Fix |
|---|---|---|
| Loose connections | Studs printed too small | Reduce negative horizontal expansion; check filament diameter setting |
| Cracking bricks | Walls too thin or infill too low | Raise wall count to 3 and infill to 30%; switch to PETG |
| Studs won't fit at all | Sockets printed too narrow | Increase horizontal expansion slightly or clear holes with a drill bit |
| Warped flat parts | Bed adhesion or material issue | Add a brim, level bed, slow first layer; use enclosure for ABS |
| Stringy studs | Retraction needs tuning | Increase retraction distance and lower print temperature in small steps |
Ready to Start Building?
Browse quality molded brick sets to pair with your printed custom parts — or ask via WhatsApp for recommendations on compatible foundations for your next project.
Frequently Asked Questions
Are 3D printed bricks as strong as molded ones?▾
Not quite, but they come close with the right setup. Use 3 walls, 30% or higher infill, and a durable material like PETG or ABS. Molded bricks still win on precision and clutch power, so use printed parts for custom elements and molded bricks for structural cores.
Where can I find free STL files for brick-compatible parts?▾
Thingiverse, Printables, MyMiniFactory, and Cults3D all host free designs. Search for 'lego compatible', 'stud', or '3d printable lego compatible kits free stl files', and prioritize files with high ratings, real printed photos, and clear print settings.
What printer settings give the best fit?▾
Print studs facing up at 0.12–0.16mm layer height with 3 walls. Then tune horizontal expansion — usually between -0.05mm and -0.1mm — after testing a small brick. Always print one test part before committing to a full set.
Is it legal to print brick-compatible parts?▾
Printing generic bricks for personal use is generally fine. Most free STL files carry Creative Commons licenses, so check the terms before any commercial use. Avoid cloning trademarked or patented branded designs to sell, and always credit original designers when you share remixes.